Maleficent DIY Halloween Outfit

This evening I'm at Gleam's Halloween Party dressed as Maleficent, I thought it was the perfect time to embrace the spirit of Halloween and up my DIY outfit making skills and share how I did it all with you guys. As long as you have the horns, red lips and contoured cheekbones people should guess you're Maleficent. So on to how I made them:
SHARE:

Storage for clothes, jewellery, makeup etc

I have the tiniest bedroom, filled with a mass of clothes, shoes, jewellery and photography props including a bird cage and model boat..
As numbers of these things have increased I have looked into storage ideas to organise my items so I can easily find everything and to make my room look more organised.

Jewellery 
Necklaces, bracelets, earrings, sunglasses, watches, broaches, hairbands and clips.
At the top there's a roll you can easily store sunglasses and watches on, which detaches at the ends with poppers so you can easily slide on your watches. 

The necklaces and bracelets hang on loops of velcro, which is nice and strong, keeping my heaviest of necklaces secure.

The flap covering the bracelet velcros works well to pin things on.

The bottom of it has mesh pockets, perfect to store bits and bobs in, and also to put your earrings through! I store hair ties, my collar tips in a mini canvas bag, hair donuts and my lace ombre crown.

Under the mesh pockets there's a flap which you can clip hair slides on to or add even more earrings. 

I bought this from Swag Bag two years ago after my friend's parents got her one for her birthday. I thought it was a rather nifty idea! Has lots of different storage areas, is easy hang up via the hook or hooks provided so it can hang on a door. It also comes with a velvet draw string bag with the idea that you can roll this up and take it away with you.

I have this inside my wardrobe door. Put two screws in which the two eyelets at the top hang onto. I have no space to hang this on the back of my door as I have all my coats on there ^_^

Rings
Recently I have accumulated lots of pretty rings which have been heaped on my desk with no real organisation. I needed to present them nicely and to free up space on my desk so I bought this handy ring display tray on ebay from a UK seller for £4.98 here. It's smaller than most listed and the best price I could find for a wooden one.

Clothes
I ran out of space in my wardrobe so I made my own rail for more clothes! In QD found some hanging basket brackets for only a couple of pounds each, then added a pole I found in the shed, and voila! This is now actually also full, this is a lovely pretty picture when I first made it. And that's the model boat I mentioned at the beginning :D

Soon needing to do a clear out! I literally have no more space! Soon adding clothes either to my blog sale page or will make a new instagram account to list clothes on. Not sure which would be best?

Makeup
From Wilko I bought this black faux leather draw to keep all my makeup and cosmetic bits all together. It was only £23 and if you wanted one, you lucky people, it's only £18 now! It fits perfectly under my desk and keeps me much more organised! 

Here's what I have in my top draw, makeup bits I used to use and might come back to. Middle draw has my makeup bag, Urban Decay Naked 2 palette, cotton wool and makeup remover. Bottom draw has all my spares of products that I use, as I tend to buy things in twos for when I run out. Also has my hair products and moisturisers.

I thought this was a great little cheap storage solution, they have it in other colours too and differing amount of draws. I don't have an ikea near me, so I've never bought anything from there. I'm also lazy and don't want to have to put something together!

Shoes
At my last house I stayed in during university, (*sigh* this was 2 years ago!) our rooms had a picture rail running around the top of the walls. This was great to hang our heels on! Unfortunately my room currently doesn't have this feature!

I hope this has been helpful to some of you! Have you got any other interesting storage suggestions?

Youtube Facebook Twitter / instagram@leannelimwalker / Website
SHARE:

Kitty Nail Tutorial

Steps:
1 - Using the black nail pen, draw across the tip of the nail, fill in tip and create a curve to the line for a more rounded shape.

2 - Draw dots where you want the cat ears to finish.

3 - Draw in the ears. Tip: Vary cat ears, some filled in, some just outlined to add more variety.

4 - Repeat on all nails.

5 - Using the silver nail art pen draw on a face. Tips: i - Practice on a piece of paper first, ii - Add a pupil detail in the eye using the black nail art pen.

6 - Add a clear top coat. Tip: Wait until the nail polish has had a while to dry and set, so the design isn't spoilt.

Barry M Nail Art Pens c/o Missguided

I found these Nail Art pens by Barry M so easy to use! I need them in more colours! They make easy work of fiddly little lines and go on opaque. I really enjoyed doing this design, each little cat face has it's own cute variations, some with their eyes closer together, or their eyes looking in slightly different directions ^_^ 

At £4.99 I think they are really reasonable, I wouldn't want to spend much more, as I don't do nail art that often and they would spent a lot of time sat with my nail polishes. So handy to add something extra to your nails with little effort!

What would you do on your nails?

Youtube Facebook Twitter / instagram@leannelimwalker / Website
SHARE:

How to make a head chain - DIY!


 photo photo.png

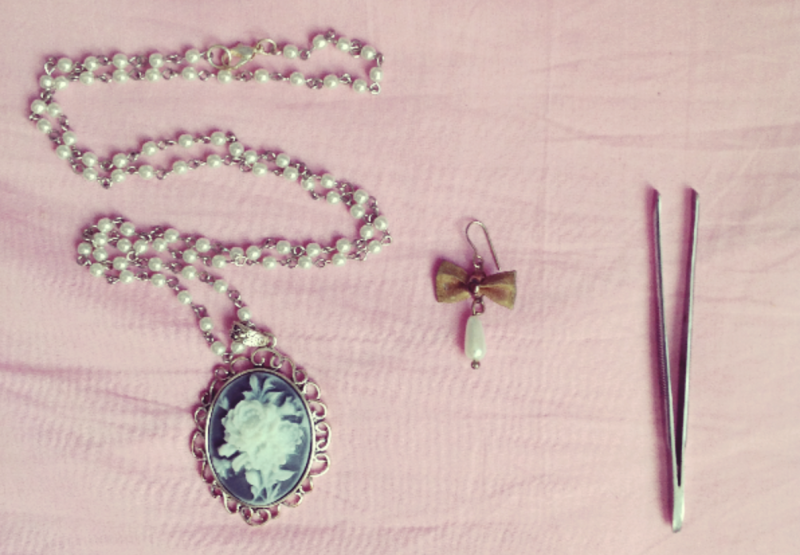
So I got a little crafty, as I like to now and again, and I decided to make my very own head chain! I kept seeing them everywhere and I wasn't really sure if I loved them enough to part with my money for one. Instead I decided to raid my  jewellery box and turn some things I never wear into something completely different! Using a necklace and an earring I created my very own head chain :)

Watch my video tutorial is you are interested in seeing how I did it! Let me see your results on instagram if you have it! Don't forget to @leannelimwalker in your pics :D


Youtube Facebook Twitter / instagram@leannelimwalker / Website
SHARE:

DIY - Pink Ombre Hair Extensions


Today I decided to attempt a pink ombre on some cheap hair extensions I bought awhile ago off ebay, but never really wore. I never really wore them for two reasons. One; they were the shade "lightest blonde' meaning yellow, the kind of yellow you would be familiar with if you get your hair bleached. It's the lightest yellow you can go, the shade which is perfect to then tone to go platinum blonde. Two; as they were around £20 for a full head set, they are sooooo thin, especially at the ends! Most of the hair is a lot shorter, resulting in the thickest parts being from the top to the middle.

I don't have pictures of the extensions properly before I toned them, but here are some instagram pictures;

You can see on the left the colour didn't match my hair, and look how thin the extensions are!

Below are my ones from Foxylocks.com, they are amazing! And matched my hair colour without me needing to do anything, and they are an amazing length too!

Anyway, back to how I toned the cheap yellow ones!

I applied Directions "white toner" straight on to the extensions and left for 15 minutes. I left one weft for an experiment though. I did end up using a whole tub, and as these extensions aren't even thick, I would advise if you were going to do this, buy several tubs incase! It would be so annoying to run out!


For the weft I was experimenting with, I decided to see if I could tone it with just my silver shampoo. I filled up a sink with warm water and squirted in some of my silver shampoo, then mixed it around. I submerged the weft and swirled it around, leaving it for awhile, checking to see when it looked silvery, then rinsed.

This worked surprisingly well! So I rinsed the wefts that had the directions toner in the sink of diluted silver shampoo, leaving them in until they looked silvery, and rinsed.

Results look so similar, top weft is with just the shampoo, bottom one you can tell it is slightly silvery and has a touch of purple from the toner. But you can hardly really tell much difference between them, so it saves time just toning with just a silver shampoo!

I still had pink semi-permanent hair dye from last summer when I had pastel pink hair, so I just used the same one. I used Flamingo pink by Directions, I got a really strong pink so I could dilute it with lots of conditioner, meaning the pots would last ages! I had tried using Manic Panic's cotton candy pink before and diluting that a bit, but I used it up fast! This one has lasted SO LONG!

In a bowl I added lots and lots of white conditioner, just a Tresemme one, doesn't have to be a specific one, just needs to be white! I added a small amount of the dye as it is very pigmented, and mixed thoroughly. I laid the wefts on top of some tin foil on a table. Then just below where I wanted the colour to start, I applied the diluted colour on to the hair, all the way down to the ends. 

Next I blended the starting line of colour with the brush, pulling the dye up so there wouldn't be a harsh line.

I added more dye to the diluted mixture, and brushed on half way between the start of the pink and the ends of their hair, applying all the way down. I repeated adding more dye, this time just applying on the ends.

I left this for around 20 minutes, then rinsed out the dye thoroughly. 

I always hear you aren't meant to dry you extensions  and usually I don't, I let them dry over night naturally, but I didn't really mind blow drying these ones as they were cheap and this was all an experiment, also I couldn't wait to see how they came out!

I think I got a pretty good gradient! 


Here are all the wefts together, not thick at all!

And here's an instagram pic of them in my hair.


Let me know your thoughts guys! Feel free to ask any questions in the comments.

Youtube Facebook Twitter / instagram@leannelimwalker / Website

SHARE:

D.I.Y

Some items I have made myself, have been thinking about making and selling more hats, bracelets and collars, if anyone would be interested?


Youtube Facebook Twitter / instagram@leannelimwalker / Website

SHARE:

Ride It Like You Stole It


Hat / I knitted myself
Tee / c/o Phixclothing, by Abandon Ship Apparel
Necklaces / Empty Casket and Topshop
Heels / c/o Loveclothing
Levis / Loveclothing
Belt / Topshop


An outfit post with a little taster of items that I will be featuring on my youtube channel this week. There are going to be two hauls! If you follow me on instagram or read my previous post, you will have seen me mention there will be a Topshop/collective haul. This will feature obviously Topshop items and also some from Loveclothing.com and Primark. Those sky high heels in my outfit are part of the second haul! The first will feature items I was sent by Phixclothing.com, this top was one of my favourites and I just had to wear it today!


The Abandon Ship Apparel brand is for both men and women. I own two Abandon Ship Apparel tees already, I would definitely recommend them, they are affordable, retailing £24.


Those shoes were such a bargain, only £27 from Loveclothing.com, yet on Missguided.com they are £40.99! They are so easy to walk in due to the platform, and such a nice shape! I actually prefer their shape over the real Jeffrey Campbell Big Litas!


I'm really looking forward to showing you all the wonderful items from the hauls, as I know hauls are popular amongst a lot of you, I'm a sucker for watching them too! I will also do a blog post for each haul for those who aren't keen on listening to my voice and watching me blab on! It will also give me an opportunity to talk more in depth about each item, its quality, how I would wear it etc and not have to worry about making a crazy long video!


I love this knitted hat I'm wearing, which I made myself! I've been thinking of selling some in the near future, along with knitted bracelets and crocheted collars, would anyone be interested? 


Youtube Facebook Twitter / instagram@leannelimwalker / Website


SHARE:
Blogger templates by pipdig